-
django의 관계형 모델 필드 - ForeignKey, OneToOneField, ManyToManyFieldDjango 2020. 1. 11. 07:14
Notion을 정리하다 충격을 좀 받고, 내용을 나도(?) 알아볼 수 있게 정리해야겠다는 생각이 들어서 다시 블로그를 쓰게 되었다. 이전 두 개의 블로그는 너무 자세히 친절하게 작성하려다 보니 하나 쓰는데 3~4시간이 걸렸다. 혼자 보는 블로그가 아니기 때문에 정확한 정보를 전달하기 위해 공식문서를 찾아보고 새로운 내용을 추가하다보니 그렇게 됐다(이제 안그럴꺼다..).
from django.db import models에 관계를 형성하기 위해 사용되는 몇 개의 필드가 있는데 그 중 많이 사용되는 세 개의 필드인 ForeignKey, OneToOne, ManyToMany 필드에 대해 정리하려고 한다.
얕고넓게 알고 있다보니 내용을 어디까지 다뤄야할지 좀 난감하지만 중요한 내용이니 만큼 정리해보자.
ForeignKey - 모델의 1:N 관계를 나타내기 위해 사용
[기본 구조] A parent <- Children
# models.py
class User(models.Model):  # parent
    name = models.CharField(max_length=20)

class Post(models.Model):  # child
    user = models.ForeignKey(User, on_delete=models.CASCADE)
    title = models.CharField(max_length=255)
    body = models.TextField()
위 코드를 아래와 같이 실행시킬 수 있다. 'objects'는 데이터베이스의 쿼리 동작을 django model에 제공하기 위해 사용되는 Model Manger(공식문서 참고)를 말한다. 모델에 대한 동작을 지원하는 메서드는 get, all, filter 외에 다양하게 있지만 지금은 기본 동작을 위해 몇 가지만 사용한다.
user = User.objects.create(name='navill')
post = Post.object.create(user=user, title='졸려..', body='잘래...')
자식 객체는 db에 [부모_id]를 갖고 있기 때문에 직접 접근할 수 있지만, 기본적으로 부모(user에는 name 필드밖에 없음) 객체를 이용해 자식 객체를 찾을 수 없다. 이러한 역관계를 지원하기 위해 django에서는 RelatedManager를 제공한다. 역관계를 정의하는 방법은 크게 두 가지가 있다.
1. [자식 모델의 소문자이름_set]을 이용(예: Post모델일 경우 -> post_set)
2. 자식 모델의 ForeignKey 설정 시, related_name='[target_name]' 속성을 지정
me = User.objects.get(name='navill')
# user에 user객체를 할당하면 해당 객체의 id가 user_id로 저장
post_by_navill = Post.objects.filter(user=me)
# 역관계
post_by_navill = me.post_set.all()  # 1번
post_by_navill = me.posts.all()  # 2번(related_name='posts' 설정)
ForeignKey('self')
외래키가 자신을 참조할 수 있다. 코드와 예제를 보면서 설명하겠다.
댓글의 기능은 게시글에 대한 댓글과 댓글의 댓글이 있을 수 있다. 아래의 모델은 [예시]를 구현하기 위한 모델이다.
--------------[예시]-------------
[게시글]
- parent comment
- child comment1
- child comment1_1
- child comment1_2
- child comment2
-------------------------------
class Post(models.Model):
    title = models.CharField(max_length=255)
    body = models.TextField()


class Comment(models.Model):
    post = models.ForeignKey(Post, on_delete=models.CASCADE)
    parent = models.ForeignKey('self', on_delete=models.CASCADE, blank=True, null=True)
    body = models.TextField(max_length=100)
# python manage.py shell >>> parent_comment = Comment.objects.create(post=post, body='parent comment') >>> child_comment1 = Comment.objects.create(post=post, parent=parent_comment, body='child comment1') >>> child_comment2 = Comment.objects.create(post=post, parent=parent_comment, body='child comment2') >>> child_comment1_1 = Comment.objects.create(post=post, parent=child_comment1, body='child comment1_1') >>> child_comment1_2 = Comment.objects.create(post=post, parent=child_comment1, body='child comment1_2')위 실행 코드는 순서대로 게시글에 대한 댓글(parent)과 댓글의 댓글들(children)로 구성된다. Comment의 parent 필드는 self(Comment 자신을 기리킴)를 가리키므로 만드시 Comment의 객체를 할당해야한다. comment의 parent 필드를 통해 자신이 어떤 댓글을 참조하는지 확인할 수 있다.
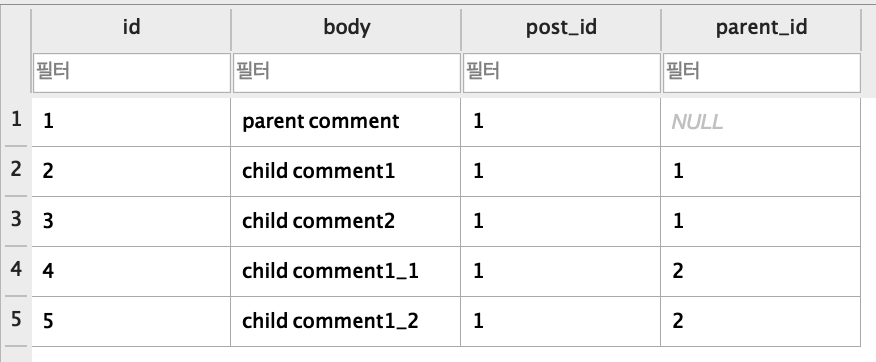
parent_id는 Comment의 id를 의미한다. 데이터베이스는 입력 순서대로 id값을 부여하고 테이블에 값을 저장하기 때문에 [예시]처럼 구현하기 위해서는 반복문과 부모 댓글의 역참조를 이용할 수 있다. 단순 반복문을 통해 그림에 있는 댓글 테이블을 [예시]처럼 나타내면 아래와 같이 구현할 수 있다(예제를 설명하기 위해 작성된 코드).
>>> first_comment = Comment.objects.get(parent=None)
>>> first_comment
<Comment: Comment object (1)>  # parent_comment
>>> for child_comment in first_comment.comment_set.all():
...     print(child_comment)
...     for c_c_comment in child_comment.comment_set.all():
...             print(c_c_comment)
...
Comment object (2)  # child_comment1
Comment object (4)  # child_comment1_1
Comment object (5)  # child_comment1_2
Comment object (3)  # child_comment2
OneToOneField - 모델의 1:1 관계를 나타내기 위해 사용
한 개의 객체가 다른 한 개의 (유일한)객체를 가리킬 때 사용된다. 역관계를 제외하면 ForeignKey의 unique=True 속성과 동일한 구조이다.
예: 한 명의 유저에게는 한 개의 프로파일만 존재
class UserProfile(models.Model):
    user = models.OneToOneField(User, on_delete=models.CASCADE)
    favorite_color = models.CharField(max_length=255)
user_profile = UserProfile.objects.create(user=user, favorite_color='blue') # user is 'navill' user.userprofile # <UserProfile: UserProfile object (1)> user_profile.user # <User: navill>1:1관계이기 때문에 별도의 접미어(_set) 없이 서로 접근이 가능하다. 추가로 OneToOneField는 parent_link 옵션을 가지고 있다.
기존의 OneToOneField에서 parent_link=True를 적용한 테스트를 할 경우 에러가 발생한다.
ManyToManyField - 모델의 M:N 관계를 나타내기 위해 사용
예를 들어, 한 개의 게시글에 여러 개의 tag가 달릴 수 있다. 또한 한 개의 tag는 여러 개의 게시글에 사용될 수 있다.
게시글A - #장고, #파이썬, #navill
게시글B - #navill, #졸려, #이게무슨일이야
게시글C - #마지막, #ManyToManyField, #navill
게시글A, B, C 각각에 #nvaill 태그가 모두 사용될 수 있고(M:1), 게시글A 하나에 #장고, #파이썬, #navill과 같이 여러개의 태그를 가질 수 있다(1:N).
tag_1 = Tag(body='#장고')
tag_3 = Tag(body='#nvaill')
tag_1.save()
tag_3.save()  # Tag db 생성 -> tag객체의 id가 먼저 생성되어야 한다.

# -> 세 개의 Post 객체에 #장고 tag가 연결
tag_1.post(post_A, post_B, post_C)  # 이후 post 객체 추가

print(tag_1.post.values())  # values(): 각 객체들이 가지고 있는 값(dict)을 list에 담아 출력
<QuerySet [{'id': 1, 'title': 'a', 'body': 'a입니다.'}, {'id': 2,
'title': 'b', 'body': 'b입니다.'}, {'id': 3, 'title': 'c', 'body': 'c입니다.'}]>

# tag_3를 게시글 post_A에 연결
tag_3.post.add(post_A)

# post를 이용해 관계된 tag 객체 출력 -> tag_set(역관계)
post_A.tag_set.all()
<QuerySet [<Tag: Tag object (1)>, <Tag: Tag object (3)>]>
ManyToManyField를 생성할 경우 데이터베이스에 자동으로 두 모델 객체의 id를 담고 있는 table이 생성된다. 이 테이블을 참고하여 M:N 관계의 데이터를 형성하고 서로를 참조할 수 있다.
- post_A(post_id=1)은 tag_1(tag_id=1)과 tag_3(tag_id=3)을 참조
- tag_1(tag_id=1)은 post_A(post_id=1), post_B(post_id=2), post_C(post_id=3)

Tag와 Post의 id값이 저장된다. - 추가할 내용
- ManyToManyField의 self, through, symmetrical에 대해 추가할 예정
- 공식 문서: through, symmetrical
'Django' 카테고리의 다른 글
Javascript에서 django url template tag 사용 (0) 2020.02.04